
How to Make Mouthwatering Greek Orange Cake at Home
Table of Contents
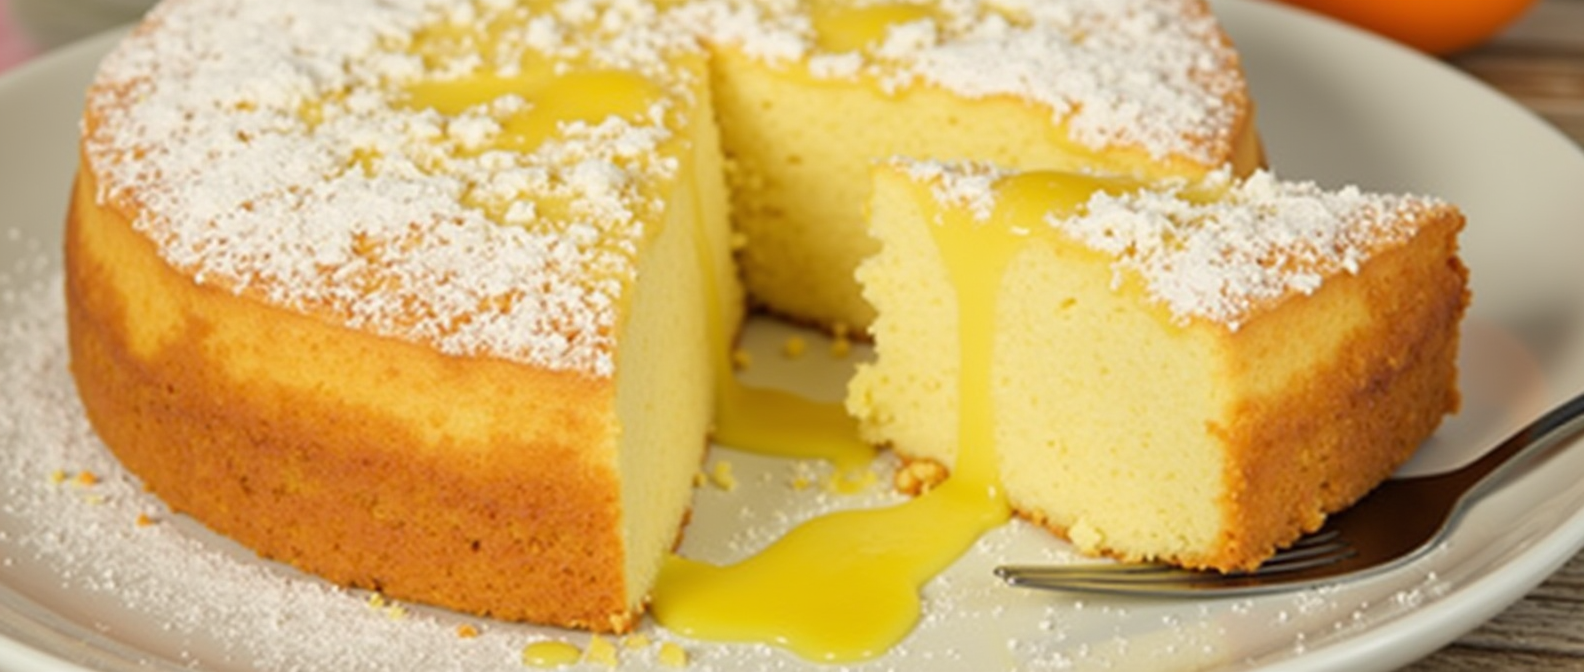
Introduction to Greek Orange Cake
Greek Orange Cake, also known as Portokalopita, has a rich and fascinating history that is deeply intertwined with the culinary history of Greece. It is a traditional dessert that is soaked in syrup and bursting with the rich citrus flavors of fresh oranges.
The origins of Greek Orange Cake can be traced back to the Byzantine era when it was common to use citrus fruits, especially oranges, in the preparation of various desserts and pastries. This tradition was influenced by the Arab culinary culture that dominated the Mediterranean region during the Middle Ages. The Arabs introduced many citrus fruits, including oranges, lemons, and limes to the region. These fruits eventually found their way into local cuisines and became a fundamental part of the Greek culinary tradition.
The creation of Greek Orange Cake was also influenced by the widespread use of filo dough in Greek pastry-making. Filo dough, a thin, flaky dough that is used in numerous Greek desserts, serves as the base for this delicious cake. The cake’s distinct texture and flavor come from the unique combination of filo dough and fresh oranges.
The recipe for Greek Orange Cake remained relatively unchanged until the 20th century when it began to incorporate more modern ingredients such as baking powder, yogurt, and soda, which helped to enhance its flavor and texture.
During the 20th century, Greek Orange Cake became a popular dessert in Greek households and local bakeries. It was typically served at family gatherings, celebrations, and religious festivals. Its popularity also spread beyond Greece to other countries as part of the global appreciation for Greek cuisine.
Today, Greek Orange Cake continues to be a beloved dessert in Greece and around the world. It is often enjoyed with a cup of Greek coffee or a scoop of ice cream. The history of Greek Orange Cake is a testament to Greece’s rich culinary history and the country’s ability to create delicious, flavorful desserts that have stood the test of time.
Greek orange cake, also known as Portokalopita, holds a significant position in both Greek cuisine and in the wider international culinary scene. Its importance and popularity can be attributed to several factors, including its unique taste, cultural implications, versatility, and health benefits.
One of the primary reasons for the popularity of the Greek orange cake is its distinctly refreshing and tangy flavor. The combination of sweet and tangy orange with the rich moistness of the cake makes it an irresistible dessert that is appreciated by people of all ages. It is often a highlight at Greek festivals and family gatherings, and its bold citrus flavor sets it apart from other traditional cakes.
Greek orange cake is not just a dessert, but it also carries a cultural significance that adds to its importance. It represents the rich history of Greek cuisine and the creativity of Greek bakers. Its traditional recipe has been passed down through generations, and each family may have its own unique twist to it, making it a symbol of Greek heritage and familial bonds.
The popularity of the Greek orange cake is not limited to Greece. Its unique flavor profile has garnered international attention and it has been featured in several global dessert cookbooks and food shows. Many international bakeries and dessert shops have also incorporated Greek orange cake into their menus, further amplifying its popularity.
The versatility of the Greek orange cake also contributes to its importance. It can be served at room temperature or chilled, making it a year-round dessert. It can also be paired with a variety of toppings, such as whipped cream, nuts, or even a scoop of ice cream, catering to different preferences and enhancing its appeal.
Lastly, Greek orange cake is also known for its potential health benefits. Oranges are rich in vitamin C and other antioxidants, which are beneficial for overall health. When made with healthier alternatives like whole wheat flour and less sugar, the cake can be a healthier dessert choice.
In conclusion, the Greek orange cake holds a special place in the world of desserts due to its unique flavor, cultural significance, versatility, and potential health benefits. Its popularity extends beyond Greek borders, making it a globally recognized and appreciated dessert.
Ingredients Needed for Greek Orange Cake
Essential Ingredients for Cake
Cake baking is both a science and an art, and it requires the right combination of essential ingredients to yield a fluffy, moist, and delicious end result. Here are the key ingredients you’ll need to create the perfect cake:
1. Flour: This is the foundation of your cake. It gives structure to your cake and binds the ingredients together. The most commonly used flour in cake baking is all-purpose flour, but other types like cake flour, whole wheat flour, and almond flour can also be used depending on the recipe.
2. Sugar: Sugar does more than just sweeten the cake. It also helps in browning and moistening the cake. The most common type of sugar used in cakes is granulated sugar, but brown sugar, powdered sugar, and honey can also be used.
3. Baking Powder/Baking Soda: These are leavening agents that help the cake rise. They react with other ingredients to produce gas bubbles, which expand during baking and make the cake light and fluffy.
4. Eggs: Eggs contribute to the structure of the cake by providing proteins that coagulate during baking. They also add moisture, richness, and flavor to the cake.
5. Fat: Fats like butter, oil, or shortening make the cake tender and moist. They also add flavor and richness to the cake.
6. Liquid: Liquids provide the necessary moisture for the cake. This can be in the form of milk, water, juice, or even coffee.
7. Flavorings: These can range from vanilla extract, almond extract, citrus zest, spices, cocoa powder, or melted chocolate. These elements give character and uniqueness to your cake.
8. Salt: Though it’s used in a very small amount, salt is vital in bringing out the flavors of the other ingredients.
Each of these ingredients plays a unique role in the cake-making process, and they all work together to create a successful final product. The key is to measure these ingredients accurately and mix them in the correct order to ensure your cake turns out as desired.
Ingredients for Syrup
In the process of making syrup, there are several key ingredients that are crucial for the desired end product. Here, we will discuss the importance of each ingredient, how it contributes to the overall taste and texture of the syrup, and some tips for choosing the best quality ingredients.
1. Sugar: It’s the base ingredient for any syrup. Whether you use white granulated sugar, brown sugar, or a natural sweetener like honey or maple syrup, this ingredient is responsible for the sweetness in your syrup. The type of sugar you choose can also affect the color and flavor of the syrup. White sugar provides a clear, neutral base, while brown sugar, honey, or maple syrup can add a deeper color and richer flavor.
2. Water: The water is used to dissolve the sugar and create a liquid consistency. The ratio of sugar to water can vary depending on how thick you want your syrup to be. More water will result in a thinner syrup, while less water will make a thicker, more concentrated syrup.
3. Flavorings: This is where you can get creative with your syrup. Natural fruit juices, spices, extracts, and even herbs can be added to give your syrup a unique flavor. Common flavorings include vanilla, cinnamon, mint, lemon, and berry. These ingredients should be added after the sugar has dissolved, and simmered to infuse their flavor into the syrup.
4. Preservatives: Although not always necessary, preservatives can be added to extend the shelf life of your syrup. Citric acid is a common preservative used in homemade syrups, as it also enhances the flavor of any added fruits or juices. Another option is to sterilize your jars before filling them with syrup, which can help to prevent the growth of bacteria.
5. Acid: Adding a small amount of acid, like lemon juice or vinegar, can help to invert some of the sugar, preventing crystallization and resulting in a smoother syrup.
6. Pectin: If you’re making a fruit syrup, adding pectin can help to thicken the syrup and enhance the fruit flavor.
Choosing high-quality, fresh ingredients will always result in a better-tasting syrup. It’s also important to note that while making syrup is relatively simple, it does require careful attention to ensure the sugar fully dissolves and the syrup doesn’t burn.
Preparing the Greek Orange Cake
Step-by-step Guide to Making the Cake
Making a cake from scratch may seem daunting, but it can be a fun and rewarding process. Here is a step-by-step guide to help you make the perfect cake:
1. Gather your ingredients: Before you begin, make sure you have all the ingredients you need. This usually includes flour, sugar, baking powder, salt, butter, eggs, and your flavorings such as vanilla extract or cocoa powder. Some recipes may require additional ingredients, so always check your recipe first.
2. Preheat your oven: Most cakes bake at around 350°F (175°C), but always follow your recipe’s instructions. Preheating your oven ensures that your cake will bake evenly.
3. Prepare your cake pans: To prevent your cake from sticking to the pan, you should grease it with a little butter or cooking spray and then dust it with flour. You can also line the bottom of the pan with parchment paper for extra insurance.
4. Mix your dry ingredients: In a large bowl, combine your flour, sugar, baking powder, and salt. Stir until they’re well mixed.
5. Beat in your wet ingredients: In a separate bowl, beat your butter until it’s creamy, then gradually beat in your eggs and flavorings. Once those are well incorporated, slowly mix in your dry ingredients until just combined.
6. Pour the batter into your pans: Try to divide the batter evenly if you’re using more than one pan. This ensures that the cakes will bake at the same rate.
7. Bake your cake: Place your pans in the preheated oven and bake according to your recipe’s instructions. You can check if the cake is done by inserting a toothpick into the center. If it comes out clean, your cake is ready.
8. Let your cake cool: Once your cake is done baking, remove it from the oven and let it cool in the pan for about 10 minutes. Then, remove it from the pan and let it cool completely on a wire rack before frosting.
9. Frost your cake: Once your cake is completely cooled, you can frost it with your favorite frosting. Be sure to frost between the layers if you made a layer cake.
10. Decorate your cake: This is the fun part where you can let your creativity shine. You can use additional frosting, sprinkles, edible flowers, or anything else you like to make your cake look as good as it tastes.
Follow these steps, and you’re well on your way to making a delicious homemade cake. Enjoy the process and take pride in your culinary creation!
Tips for Perfect Cake Preparation
Cake preparation can be a fun and rewarding task, but it can also be a bit challenging if you’re not familiar with the process. Here are some tips to help you achieve perfect cake preparation:
1. **Choose the right recipe:** Not all cake recipes are created equal. Some are more complicated than others, so it’s a good idea to choose a recipe that matches your skill level. If you’re a beginner, start with a simple recipe and gradually work your way up to more complex ones.
2. **Use the correct equipment:** Having the right tools can make a big difference in the outcome of your cake. Make sure you have a good quality mixing bowl, measuring cups and spoons, and the right size baking pan. A cake tester or toothpick is also handy for checking if the cake is done.
3. **Prep your ingredients:** Before you start, measure out all your ingredients. This will ensure that you have everything you need and will prevent you from having to stop and measure in the middle of mixing.
4. **Follow the recipe closely:** Read the recipe carefully and follow the instructions exactly. Baking is a science, and even small deviations can affect the outcome of your cake.
5. **Don’t overmix the batter:** Overmixing the batter can make your cake tough instead of tender. Mix just until the ingredients are combined.
6. **Preheat the oven:** Make sure your oven is at the correct temperature before you put the cake in. An oven that’s too hot or too cold can cause the cake to bake unevenly.
7. **Bake in the center of the oven:** The center of the oven usually provides the most consistent heat. Placing your cake here will help it bake evenly.
8. **Cool the cake properly:** It’s important to let your cake cool before you try to frost it. If you try to frost a warm cake, the frosting will melt and run off.
9. **Practice patience:** Baking a perfect cake takes time and patience. Don’t rush the process. If you follow the recipe and take your time, you’ll be rewarded with a delicious cake.
Remember, practice makes perfect. The more you bake, the more comfortable you’ll become with the process, and the better your cakes will be. Happy baking!
Preparing the Orange Syrup
Instructions for Making the Syrup
The process of making syrup is simple but requires careful attention to details to ensure that the desired consistency and sweetness are achieved. Here are step-by-step instructions to guide you through the process:
1. **Gathering of Ingredients:** Before you begin, it is crucial to gather all the necessary ingredients for making the syrup. The basic ingredients for a simple syrup often include sugar and water. However, depending on the specific type of syrup you want to make, you might need additional ingredients like fruits, spices, honey, or herbs.
2. **Measurement of Ingredients:** The next step is to accurately measure the ingredients. The standard ratio for a simple syrup is equal parts sugar and water. If you are using other ingredients, you should adjust their quantities depending on how strong you want their flavors to be in the syrup.
3. **Mixing of Ingredients:** After measuring, combine the ingredients in a pot. If you are making a flavored syrup, this is when you would add in your chosen flavorings.
4. **Heating Process:** Put the pot on a stovetop and apply heat. Stir the mixture continuously to ensure the sugar dissolves completely.
5. **Simmering:** Once the sugar has dissolved and the mixture has started to boil, reduce the heat and let the mixture simmer. The duration of simmering depends on how thick you want your syrup to be. Generally, the longer it simmers, the thicker the syrup will become.
6. **Cooling and Straining:** After simmering, remove the pot from the heat and allow the syrup to cool. If you have added flavorings like fruits or herbs, you will need to strain the syrup to remove these solid pieces.
7. **Storage:** Once cooled, transfer the syrup to a clean glass jar or bottle for storage. The syrup should be stored in the refrigerator and generally lasts for about a month.
8. **Usage:** The syrup can be used immediately after cooling or it can be stored for later use. It’s a versatile addition to many dishes, drinks, and desserts.
Remember, safety should always be your top priority when preparing any dish or beverage, including syrup. Always handle hot utensils and ingredients with care to avoid burns and other injuries.
Tips for a Perfect Syrup
Creating the perfect syrup can significantly enhance the flavor of your beverages, desserts, or any other dish that requires a sweet touch. Here are some tips to help you achieve the perfect syrup:
1. **Choosing the Right Sugar**: The type of sugar you choose for your syrup can significantly impact its flavor and texture. Cane sugar is most commonly used, but you can also experiment with brown sugar, coconut sugar, or even honey. Each type of sugar will lend a unique flavor to your syrup.
2. **Proportions Matter**: The standard ratio for a simple syrup is one part water to one part sugar. However, you can adjust this ratio based on your preference. If you want a thicker syrup, use more sugar. For a lighter, less sweet syrup, increase the amount of water.
3. **Stirring is Key**: When making syrup, make sure to stir the mixture constantly. This will help the sugar dissolve evenly and prevent it from burning at the bottom of the pan.
4. **Boil for the Right Time**: Overboiling can cause your syrup to caramelize and develop a bitter taste. On the other hand, undercooking may result in a syrup that’s too thin. As a general rule, boil your sugar and water mixture until all the sugar has dissolved and then let it simmer for a few minutes before removing it from the heat.
5. **Flavor Additions**: Adding flavors to your syrup can take it to the next level. You can infuse your syrup with various spices, herbs, fruits, or even extracts like vanilla or almond. Just make sure to strain any solid ingredients out before storing.
6. **Proper Storage**: To keep your syrup fresh and flavorful, store it in a clean, airtight container in the refrigerator. Most homemade syrups can last up to a month if stored properly.
7. **Experiment**: Don’t be afraid to play around with different types of sugars, flavors, and ratios. The beauty of making your own syrup is that you can customize it to your taste.
Remember, the key to making the perfect syrup lies in understanding the process and being willing to experiment until you find the perfect combination.
Combining and Finishing the Greek Orange Cake
Instructions to Combine Cake and Syrup
In this section, we will provide detailed instructions on how to properly combine the cake and syrup in order to achieve the best flavor and texture. Combining the cake and syrup is a critical step in the cake-making process as it adds moisture and flavor to the cake making it delicious and irresistible.
Step 1: Let Cake Cool: Once your cake has finished baking, allow it to cool completely. This is a crucial step because if you add syrup to a hot cake, it will cause the syrup to evaporate and the cake will not absorb the syrup properly.
Step 2: Prepare the Syrup: While your cake is cooling, you can begin preparing your syrup. Depending on the cake recipe, this could mean simply warming up a pre-made syrup or creating your own.
Step 3: Prick the Cake: Before you apply the syrup, prick the top of the cake with a fork. This allows the syrup to seep into the cake, ensuring that it is evenly distributed throughout.
Step 4: Apply the Syrup: Slowly pour the syrup over the cake, making sure to cover the entire surface. You can use a brush or spoon to spread the syrup evenly.
Step 5: Let the Cake Absorb the Syrup: Once the syrup has been applied, wait for a few minutes to allow the cake to absorb it.
Step 6: Repeat the Process: Depending on how moist you want your cake to be, you can repeat steps 3-5.
Step 7: Serve the Cake: After the cake has absorbed all the syrup, it’s ready to be served.
Remember, the goal of combining the cake and syrup is to enhance the flavor of the cake and give it a moist, rich texture. The process may seem simple, but it requires patience and precision to ensure that the syrup is evenly distributed and fully absorbed.
Tips for a Beautifully Finished Cake
Creating a beautifully finished cake can seem like a daunting task, especially for beginners. However, with the right tips and tricks, you can create a cake that not only tastes delicious but also looks stunning. Here are some suggestions for achieving a beautifully finished cake:
1. Preparation: Start with a smooth, leveled cake. Before you begin frosting, make sure your cake layers are completely cool. Trim any dome off the top of each layer to create a flat surface. This will make stacking and frosting easier.
2. Crumb Coat: Apply a thin layer of frosting all over your cake to seal in the crumbs. After applying the crumb coat, refrigerate your cake to allow the frosting to harden. This step will ensure that your final layer of frosting is crumb-free.
3. Use the right tools: A rotating cake stand and an offset spatula can significantly help in frosting the cake evenly. A cake scraper or bench scraper can also assist in achieving sharp edges and smooth sides.
4. Piping: Piping bags and various tips can be used to add decorative borders, flowers, and other designs on your cake. Practice on parchment paper before moving to the cake to get a feel for how the bag and tip work.
5. Smooth Frosting: To get a smooth finish, dip your spatula or scraper in hot water, wipe off the excess water, and then use it to smooth the frosting. The heat helps to even out the frosting.
6. Fondant Finish: If you prefer a perfectly smooth, firm finish, consider covering your cake with rolled fondant. It can be rolled out and draped over the cake, then smoothed out with a fondant smoother.
7. Edible Decorations: Consider using edible decorations like fresh flowers, fruits, chocolate shavings, or sprinkles to add color and texture to your cake.
8. Patience: One of the most important tips is to be patient. Don’t rush the process. If you make a mistake, remember that you can always scrape off the frosting and start again.
9. Practice Makes Perfect: The more you practice, the better you’ll get. Don’t be discouraged if your first few cakes don’t look as perfect as you’d like.
10. Final Touches: After you have finished decorating, refrigerate the cake until the frosting is firm. This will make it easier to cover and transport. Just remember to serve it at room temperature for the best flavor and texture.
In conclusion, creating a beautifully finished cake requires some practice and patience. But with the right preparation, tools, and techniques, you can create a stunning centerpiece for any celebration.
Serving Suggestions for Greek Orange Cake
Traditional Greek Serving Ideas
In Greek cuisine, tradition plays a major role in how dishes are served and enjoyed. Below are some traditional Greek serving ideas:
1. Meze: This is a collection of small dishes served before the main course or as a meal itself. They are often served with ouzo, a traditional Greek anise-flavored spirit. Mezes can include a variety of foods, including olives, cheese, hummus, octopus, and stuffed grape leaves.
2. Greek Salad: This is a traditional dish often served as a side or starter. It typically includes tomatoes, cucumbers, onion, feta cheese, and olives, seasoned with salt, oregano, and dressed with olive oil.
3. Moussaka: This is a layered dish traditionally served as a main course. It consists of layers of sautéed eggplant, minced meat, and a creamy béchamel sauce, baked in the oven.
4. Souvlaki: Another popular main dish, souvlaki consists of small pieces of meat and sometimes vegetables grilled on a skewer. It can be served on a platter, in a pita sandwich, or as a dinner with a side of salad and tzatziki sauce.
5. Baklava: This sweet pastry is a traditional dessert in Greek cuisine. It’s made of layers of filo filled with chopped nuts, sweetened and held together with syrup or honey.
6. Greek Yogurt with Honey and Nuts: This is a traditional Greek dessert or breakfast. Thick, creamy Greek yogurt is topped with walnuts and drizzled with honey.
7. Wine and Ouzo: No Greek meal is complete without a glass of local wine or ouzo. These beverages are often served both during and after the meal.
8. Coffee: Greeks love their coffee, and it is traditionally served strong and sweet.
These traditional serving ideas not only offer a taste of the rich Greek cuisine but also embody the Greek culture of enjoying food in a leisurely and social manner.
Modern and Creative Serving Suggestions
Serving food in unique and creative ways can make the dining experience much more enjoyable and memorable. In today’s culinary world, chefs and food enthusiasts constantly experiment with new and innovative serving suggestions to elevate their dishes. Here are some modern and creative serving suggestions that can be tried at home or in professional settings.
1. Deconstructed Dishes: This is a popular trend in high-end restaurants, where the components of a classic dish are presented separately and creatively on a plate. This not only allows diners to appreciate each element of the meal but also adds a unique visual appeal to the dish.
2. Food in Miniature: Serving food in bite-sized portions or miniature versions is another creative way to present your dishes. This can be especially appealing at parties or gatherings, where guests can easily sample a variety of dishes.
3. Edible Containers: Edible containers like bread bowls or chocolate cups make for an interesting and enjoyable eating experience. This also eliminates waste and adds an extra layer of flavor to the dish.
4. Layering: This involves arranging different components or layers of a dish in a clear glass or jar. This is commonly seen in desserts like parfaits or appetizers like seafood cocktails.
5. Food on Natural Elements: Using materials like slate tiles, wooden planks, or even leaves as serving plates can add a rustic touch to your presentation. Just ensure these elements are food-safe and cleaned properly.
6. Molecular Gastronomy: This involves using scientific techniques to create innovative dishes. Examples include creating foams, gels, and spheres, or using liquid nitrogen to freeze foods instantly.
7. Creative Cutlery: Using unconventional items as cutlery, like pipettes for sauces or tweezers for small ingredients, can add a creative touch to your serving style.
8. Interactive Serving: Allowing guests to assemble or finish their dishes at the table can make the dining experience more interactive and fun. For instance, serving a fondue or a DIY taco station can be quite engaging.
Remember, the key to modern and creative serving suggestions is to think outside the box while keeping the food’s taste, quality, and safety at the forefront.
Storing and Reheating Greek Orange Cake
Proper Storage Techniques
Proper storage techniques are crucial to maintaining the quality, usability, and longevity of items, whether they’re everyday household goods, perishable food items, important documents, or high-value assets. They ensure items are not only well-preserved but also easily accessible when needed.
1. Organization: The first step in proper storage is organization. Items should be sorted based on their type, usage, and frequency of access. Labeling boxes, shelves, or storage areas can also make it easier to locate items.
2. Temperature Control: Certain items like wine, artwork, and sensitive documents require specific temperatures for optimal preservation. Climate-controlled storage units can be used for these types of items.
3. Proper Packaging: The right packaging can protect items from dust, moisture, pests, and damage. For example, vacuum sealing can extend the shelf life of food, while acid-free boxes can keep documents and photos from deteriorating.
4. Rotation: This is particularly important for food storage. Using the ‘first in, first out’ principle can prevent food from spoiling.
5. Security: For high-value items, proper storage also includes security measures. This could mean using a safe or a storage unit with robust security systems.
6. Regular Maintenance: Proper storage isn’t a one-time task. Regular checks and maintenance are necessary to ensure that the stored items remain in good condition.
7. Space Utilization: Techniques like vertical storage, using multi-purpose furniture with storage options, and installing shelves can help use the available space efficiently.
8. Digital Storage: For digital files, proper storage means using reliable hardware or cloud services, regularly backing up files, and using encryption for sensitive data.
By implementing these proper storage techniques, individuals and businesses can ensure their items are well-protected, easy to find and remain in the best possible condition for when they’re needed. This can also result in cost savings, as it reduces the likelihood of items needing to be replaced due to damage or deterioration.
How to Reheat for Best Taste
When it comes to reheating your meals, the primary goal is to retain the food’s original taste and texture. There are several ways to reheat food, but some methods are more effective than others, depending on the type of food you’re dealing with.
Firstly, let’s start with the microwave, a common household appliance used for reheating food. While it might be the quickest and most convenient method, it isn’t always the best option for all types of food. It’s important to use a microwave-safe dish and cover it lightly to allow steam to escape. Stir your food halfway through heating to ensure even warmth and prevent dry or overcooked spots.
However, for foods such as pizza, roasted meats, or crispy fried items, an oven or toaster oven might be a better option. Reheating in the oven can take a little longer but it can help to maintain the texture of these foods, preventing them from turning soggy or rubbery. Preheat your oven to about 350 degrees Fahrenheit, and monitor your food as it heats to avoid overcooking.
For soups, stews, or sauces, reheating on the stovetop can be the best method. Pour your food into a pot or saucepan and reheat slowly over medium heat, stirring occasionally until it’s hot enough.
Moreover, for foods like steamed vegetables or fish, using a steamer to reheat can help to maintain the food’s texture and nutritional value.
Lastly, remember to check the internal temperature of your reheated food, especially meat, to ensure it reaches a safe temperature of at least 165 degrees Fahrenheit. This can help to eliminate any potential bacteria or pathogens that may have grown while the food was stored.
In conclusion, the best method for reheating your food will depend on the type of food, but with these tips, you can ensure that your reheated meals are just as tasty as when they were freshly cooked.
Conclusion: Enjoying Your Homemade Greek Orange Cake
Recap of the Recipe Process
We will delve into the details of the recipe process that has been discussed earlier. This recap is designed to reaffirm the steps and techniques that were employed, ensuring that they are understood and can be replicated effectively.
Firstly, we’ll revisit the initial phase of the recipe process, which involves the selection of ingredients. We’ll reiterate the importance of choosing high-quality, fresh ingredients, as well as the impact this has on the overall taste and success of the dish. We’ll also discuss the quantities needed, highlighting the need for accurate measurements to ensure the balance of flavors.
Next, we’ll look back at the preparation of these ingredients. This includes any washing, chopping, marinating, or other preparatory methods that were used. We’ll emphasize the importance of following these steps closely, as they can significantly affect the final outcome of the recipe.
The cooking process itself will be the next part of our recap. We’ll go over the techniques that were used, such as sautéing, baking, or grilling, as well as the timing for each step. We’ll also revisit any special tips or tricks that were mentioned, to help you achieve the best result possible.
Following this, we’ll recall the steps involved in serving the dish. We’ll highlight any specific presentation techniques that were recommended, and remind you of the suggested accompaniments or garnishes.
Finally, we’ll reemphasize the importance of cleaning up after the cooking process. This includes properly storing any leftover ingredients, cleaning the used utensils and cookware, and ensuring the cooking area is left neat and tidy.
In summary, this recap of the recipe process will provide a comprehensive review of the steps involved, from ingredient selection right through to the clean-up. This should serve as a helpful reference, enabling you to recreate the dish successfully and with confidence.
Encouragement for First-time Bakers
Getting started with baking can be a daunting task for many. However, it is essential to remember that everyone has to start somewhere, and it’s perfectly normal to make mistakes along the way. Here are some words of encouragement and tips for first-time bakers.
1. Understand that it’s okay to make mistakes: Baking is a precise science, and even the most experienced bakers make mistakes. It’s all part of the learning process. If a recipe doesn’t turn out as planned, remember that it’s not a failure but a learning opportunity. Analyze what might have gone wrong and try again.
2. Start with simple recipes: As a beginner, it’s advisable to start with simple recipes. This could be a basic bread, cookies, or muffins. These recipes often require fewer ingredients and steps, making them less complicated for first-time bakers. Once you’re comfortable with these, you can gradually move on to more complex recipes.
3. Patience is key: Baking requires a considerable amount of patience. From carefully measuring ingredients, to waiting for dough to rise, or the baking process itself, it’s not a hobby that can be rushed. Don’t get disheartened if things take longer than expected. The end result is often worth the wait.
4. Enjoy the process: One of the most important aspects of baking is to enjoy the process. It’s not just about the end product, but also about the joy that comes from creating something from scratch. Whether it’s kneading dough or decorating cupcakes, try to find enjoyment in every step.
5. Seek help and learn: There are countless resources available for first-time bakers. From online tutorials, blogs, cookbooks, and even baking classes, there’s a wealth of information out there. Don’t hesitate to seek help or ask questions when needed.
Remember, every baker was once a beginner. It’s all about practice, patience, and a love for the craft. So, put on your apron, preheat the oven, and start your baking journey. You’ll be surprised at how satisfying and fun it can be.